For several years I've wanted to start branding my crafts under cindymadewhat? but somehow cindiasaurusrex took over and I thought the cindymadewhat? might be lost forever. Then I thought, no! I can bring it back. I just need to get it rolling.
I'm still a fashion machine. No, really! I won't abandon it forever, but cindymadewhat? will be my crafting adventures and hopefully one day my line (I reserved the name on etsy two years ago just in case). So crafting adventures will live here, and anything else I feel like doing or saying will remain on fashion machine.
I've imported some of my sewing-related entries from fashion machine to get things started.

A fashion machine crafting adventure.
Wednesday, March 16, 2011

Tuesday, March 1, 2011
Ye ole fashion blog.
The Renfest is in town again, and in honor, I will share a medieval post!
A few years ago, my friend purchased a red peasant top and a blue corset from the festival. She had a friend who was a teacher that asked her to help chaperon a a highschool field trip to the festival, and she decided to dress up for the kids. She didn't have a skirt to go with her corset top, so she asked me to make her one.
We went to the store and picked out a few fabrics that matched the corset top - a dark blue, a dark red, and an off-white to resemble a petty coat. I didn't have a pattern (as usual), so I took her measurements and just started cutting away. We wanted the skirt to look as authentic as possible while staying on our zero-to-none budget.
I essentially made three skirts out of the three different colors, each one slightly different in fullness. I layered the skirts from bottom to top: white (for a petty coat), dark red, and then dark blue.
In order to create some fullness in the skirt, as well as show off all of the layers, I scrunched up the top two layers and sewed them in place. The result was some-what of a curtain effect.
I finished off the waist band with elastic, and the skirt was done! It took several yards of fabric, and just a few hours, and her outfit was complete.


A few years ago, my friend purchased a red peasant top and a blue corset from the festival. She had a friend who was a teacher that asked her to help chaperon a a highschool field trip to the festival, and she decided to dress up for the kids. She didn't have a skirt to go with her corset top, so she asked me to make her one.
We went to the store and picked out a few fabrics that matched the corset top - a dark blue, a dark red, and an off-white to resemble a petty coat. I didn't have a pattern (as usual), so I took her measurements and just started cutting away. We wanted the skirt to look as authentic as possible while staying on our zero-to-none budget.
I essentially made three skirts out of the three different colors, each one slightly different in fullness. I layered the skirts from bottom to top: white (for a petty coat), dark red, and then dark blue.
In order to create some fullness in the skirt, as well as show off all of the layers, I scrunched up the top two layers and sewed them in place. The result was some-what of a curtain effect.
I finished off the waist band with elastic, and the skirt was done! It took several yards of fabric, and just a few hours, and her outfit was complete.


Thursday, February 24, 2011
tips & tricks: short cuts that aren't really short cuts
When you teach yourself a new art, you often miss out on the tips and tricks that you would get from a teacher. So, for those of you teaching yourself to sew solely by written or video tutorials, I am going to start posting tips and tricks that I've learned along the way.
I started sewing when I was 14. As most do, my first experiences were creating pillows, pajama pants, and draw-string back packs. My mom bought me some patterns for simple pants, shirts, and dresses. I would pour over the instructions, following every word. Always pinning, ironing, and basting when I supposed to.
Lolz, not really. Okay, not at all.
I think I went mostly by the instructions, but I've always been a bit lazy, which made me reluctant to spend as much time as I should on the small details. Then, once I had more experience, I basically strayed away from patterns all together. I often get inspired by clothes that I like to make a slightly different version of my own. Or if there is a style that I want, but can't find in stores, I'll usually just picture it in my head and then get to work.
So when I say I don't use patterns, I don't just mean store-bought patterns. I don't use patterns at all. I don't make my own. I don't even really plan. I just pick a place to start and then keep going until it is done. Sometimes my pieces come out awesome and sometimes they suck. Sometimes they end up completely different where they started, for better or worse. I don't really like patterns, and making things up as I go is more interesting to me.
That being said, it should be obvious that I have made my fair share of mistakes in sewing. Most of them were due to trying to save time. If there is one tip I can give to you it is this:
Trying to save time DOES NOT EVER SAVE TIME.
Seriously.
I can't tell you how many time I've skipped steps to save time, and then realized I made a dumb mistake that I had to undo and then redo the proper way.
I started sewing when I was 14. As most do, my first experiences were creating pillows, pajama pants, and draw-string back packs. My mom bought me some patterns for simple pants, shirts, and dresses. I would pour over the instructions, following every word. Always pinning, ironing, and basting when I supposed to.
Lolz, not really. Okay, not at all.
I think I went mostly by the instructions, but I've always been a bit lazy, which made me reluctant to spend as much time as I should on the small details. Then, once I had more experience, I basically strayed away from patterns all together. I often get inspired by clothes that I like to make a slightly different version of my own. Or if there is a style that I want, but can't find in stores, I'll usually just picture it in my head and then get to work.
So when I say I don't use patterns, I don't just mean store-bought patterns. I don't use patterns at all. I don't make my own. I don't even really plan. I just pick a place to start and then keep going until it is done. Sometimes my pieces come out awesome and sometimes they suck. Sometimes they end up completely different where they started, for better or worse. I don't really like patterns, and making things up as I go is more interesting to me.
That being said, it should be obvious that I have made my fair share of mistakes in sewing. Most of them were due to trying to save time. If there is one tip I can give to you it is this:
Trying to save time DOES NOT EVER SAVE TIME.
Seriously.
I can't tell you how many time I've skipped steps to save time, and then realized I made a dumb mistake that I had to undo and then redo the proper way.
- Use pins. I know, they are annoying. It takes forever to pin something and then have to unpin it later. They prick your fingers and get stuck in the carpet and they suck, but just do it. Your seams will come out neater and your whole piece will come together better overall.
- Baste. Baste pleats, hems, large continuous sections, zippers, gathered sections, whatever. If it is not a plain, straight stitch, baste it. Especially gathered sections. For real.
- Iron. Yep. Iron folded sections. Iron pleats, iron seams, iron waist bands and hems. This will make sewing much easier and will make the final piece look better crafted in general. NOTE: Pay attention to the setting on your iron. Don't use a hot, steam setting meant for cotton on a satin material. Be smart. Or look it up.
- Measure. Yeah, it seems silly to mention it, but I tend to just start cutting without really measuring anything. Eye-balling it doesn't always work.
- Try it out as you go. If you are making clothes, try them on throughout the process. That way, if something doesn't fit the way it is supposed to, you can adjust it before it is too late. If you are making a bag or a purse, make sure the pockets/straps/whatevers are the right size and are placed properly.
Tuesday, February 15, 2011
Get it?
I kind of have this obsession with home-made halloween costumes.

Freshman Year - Old scifi movie robot.

Sophomore Year - Link from the Zelda series
Junior Year - Jessie from Team Rocket (not pictured because it was kind of ugly)
 Senior Year - Steampunk Zatana
This past year for Halloween I finally did a costume I've been wanting to do for a while: a lion.
This costume was very hit or miss, as it is a play off of my last name. Those who know me well loved it, but those who know me by first name only thought it was cute, but didn't get why it was supposed to be clever. Either way, I consider it a success.
I have also always wanted to wear a child's Halloween costume as it is always humorous.
I found a toddler's lion costume and performed some reconstructive surgery to make it fit.
This costume was very hit or miss, as it is a play off of my last name. Those who know me well loved it, but those who know me by first name only thought it was cute, but didn't get why it was supposed to be clever. Either way, I consider it a success.
I have also always wanted to wear a child's Halloween costume as it is always humorous.
I found a toddler's lion costume and performed some reconstructive surgery to make it fit.

This involved taking the elastic out of the hood so I had enough room for my twenty-something-year-old head (the easiest part).

 I cut up each side and made biased tape out of ribbon to line the edges. I hammered in eyelets (I quickly learned that it is not the easiest task in the world). Then I strung it up with lace. The corset-like result allow me to easily fit the vest over my giant man-shoulders, but then fit it to my chest. As you can see, the vest stopped right at my natural waist.
I also cut and tucked the arm bands to make them look neater.

I then made a simple, short circle skirt using fabric given to me by a friend.

I took the tail that I had removed from the back of the lion vest and added it to the skirt (so there wasn't an awkward tail sticking out of my mid-back).


And viola, my lion costume was born.
Admittedly, the first two parties that I wore the costume to, I didn't have time to make the skirt, so I just wore it with jean shorts and tights, which made me look even more typical of a lazy college student. The costume went over well both ways.
Admittedly, the first two parties that I wore the costume to, I didn't have time to make the skirt, so I just wore it with jean shorts and tights, which made me look even more typical of a lazy college student. The costume went over well both ways.
Sunday, January 30, 2011
I am the bracelets you sport, everything you have ever missed, and more
 For my birthday this year my mom got me subscriptions to two magazines: a diy clothes magazine and a diy jewelry magazine. This bracelet was inspired by one of the articles in the jewelry magazine.
I started by sewing together a few scraps of pink and black fabric as a base.
The blue flower was taken from scraps of a dress I remodeled (see this blog post), the red flower was made from lace, the beading was taken from pre-made chain of beads, and the X is an iron-on letter.
The bracelet ties closed with soft white lace. It looks pretty awesome, but can be tricky to tie by myself.
The bracelet is really soft and super comfortable.
I feel that it is a very cindiasaurus-esque piece of jewelry.
I basically heart it a lot.


Paaartay skirt!
Made this skirt for clubbing! Partly modeled it after another skirt I own. No pattern used, just kinda put it together as I went. Material given to me by a friend. It's super comfy and nice and cool - great for dancing!
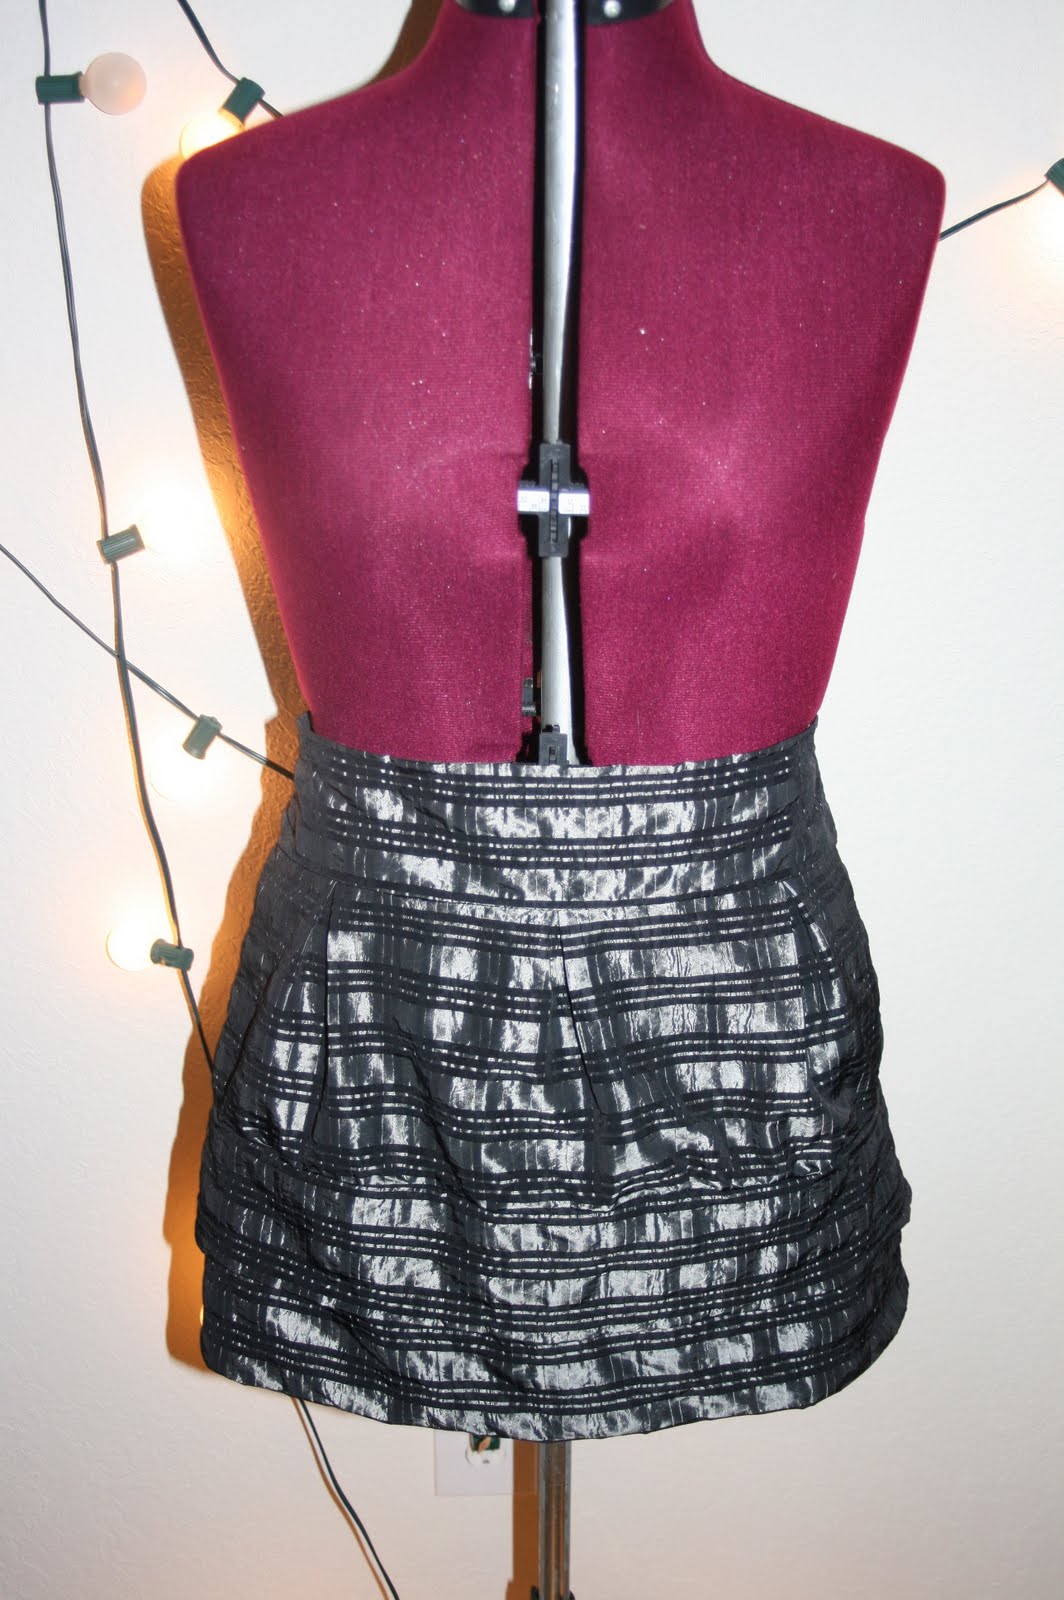 High waisted skirt.
 Thick waist band and wide pleating!
 First time playing with big pleating - fitted waist opens up to a loose, puffy bottom.
 back view.
 back pleating/zipper detail.
 double layer band on bottom.
 big ole bow!
Thursday, January 1, 2009
so this is the new year, but i don't feel any different
A while ago when my Nana came to visit, she gave me a bunch of crazy old lady dresses that I could cut up and play around with.
While I was waiting around for the New Years Eve festivities to start, I decided to make a new outfit for the occasion.

Before!
I didn't think to take a picture of me wearing it before I started cutting it up.

After!
I combined it with a little bit of fabric Jimmie gave me for Christmas.

The Back!
The skirt was a lot wider than I am, so its bunched up in the back and it ties to close.
Winter break went by a lot quicker than I had planned and I didn't get to do as much sewing as I had hoped. But it's not over yet, so we'll see what I manage before next week.
While I was waiting around for the New Years Eve festivities to start, I decided to make a new outfit for the occasion.

Before!
I didn't think to take a picture of me wearing it before I started cutting it up.

After!
I combined it with a little bit of fabric Jimmie gave me for Christmas.

The Back!
The skirt was a lot wider than I am, so its bunched up in the back and it ties to close.
Winter break went by a lot quicker than I had planned and I didn't get to do as much sewing as I had hoped. But it's not over yet, so we'll see what I manage before next week.
Subscribe to:
Posts (Atom)